Left feeling unenthusiastic by your favourite sneakers, and not even a box-fresh pair will reignite your sneaker flame? Well, it might not be game over for your once-loved kicks.
We’ve seen a rise in people looking for personalised trainers, with everyone from sneaker fanatics to creative kids looking for super-cool street styles with a twist in a bid to stand out from the crowd. But, with custom designs often costing a small fortune, it’s time to try other means – lacing shoelaces.
Don’t rule out shoelace styles as a great way to pimp your trainers; while learning different ways to lace a shoe may seem like a pastime for someone with way too much time on their hands, you’d be surprised how a couple of loops and weaves can take your everyday sneakers from drool to cool!
Check out our creative shoelace patterns for yourself in our step-by-step guide.
The ladder
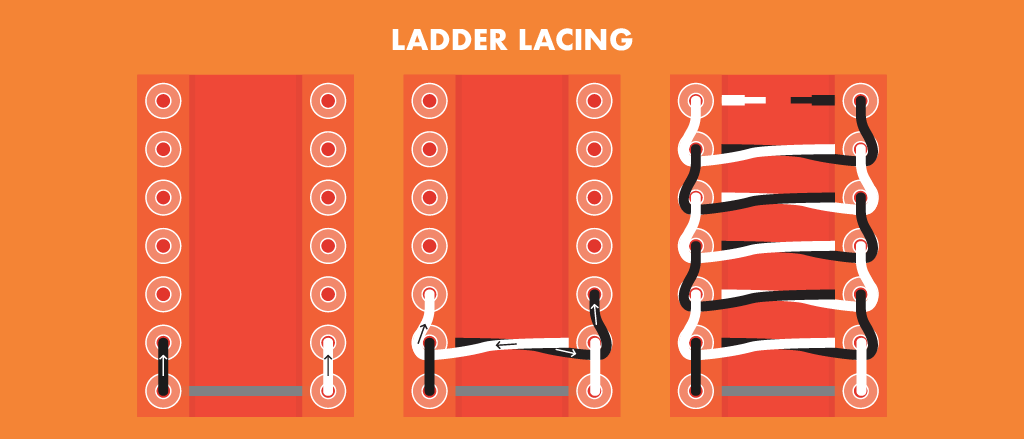
‘The ladder’ does what it says on the tin really. This distinctive lacing style, commonly used on military boots, involves the laces being woven tightly both vertically and horizontally to form a very secure, ladder-like design on shoes with at least three eyelet pairs.
Though harder to tighten, this pattern is particularly effective on hiking or ice-skating boots that require laces to hold firmly for periods of time.
Here’s how to ladder-up your shoe game (sorry!):
- Start by pulling both ends of the lace upwards through the first pair of eyelets, making sure that both sides are even in length.
- Pull the ends straight up the sides of the shoes and into the next set of eyelets.
- From here, run each lace across to the opposite side and weave through the vertical laces you made in step 2.
- Run this woven lace through the next set of eyelets straight above and repeat the process until you reach the final eyelet holes at the top of the shoe.
- Finish by tying the ends into a simple bow or knot – however you prefer!
The shining star
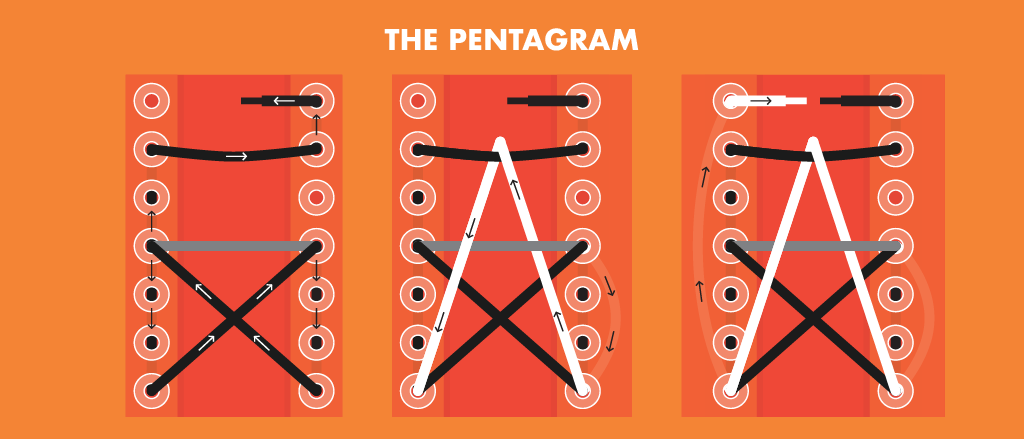
Also known as the ‘upright pentagram’, this funky, purely decorative style produces a five-pointed star pattern in the centre of your shoe. You will achieve a looser fit that’s trickier to tighten, but if you’re after an aesthetic to wow your friends, this one is the real superstar (we’ll stop now).
Follow these simple steps, choosing a flatter or thinner pair of laces to allow for multiple passes through the same eyelet, as well as a shoe with at least five eyelet pairs:
- For a shoe with seven pairs of eyelets, start by threading both laces from the outside through the middle eyelets (pair four). Adjust so the left end is longer than the right.
- Pull the left lace downwards on the inside and upwards through the very last eyelet on the left (pair seven).
- Bring this lace diagonally upwards and into the right-hand eyelet where you started.
- Then, pull the lace (now on the right) straight down and up through the very last eyelet.
- Bring it diagonally upwards, this time into the middle eyelet (pair four) on the left.
- Pull the lace straight upwards on the inside to the second pair of eyelets (towards the top of the shoes), before going straight across into the second right eyelet, in an upwards direction and out through the very first eyelet (still on the right).
- Now for the right-hand lace; pull the end straight downwards on the inside and through the bottom right eyelet (pair seven).
- Then, pull the lace diagonally up and hook over the mid-point of the vertical ‘rung’ at eyelet pair two.
- Move the lace downwards and into the bottom-left eyelet, before pulling vertically all the way to the first left-hand eyelet and out through the hole. Et voila!
The lattice
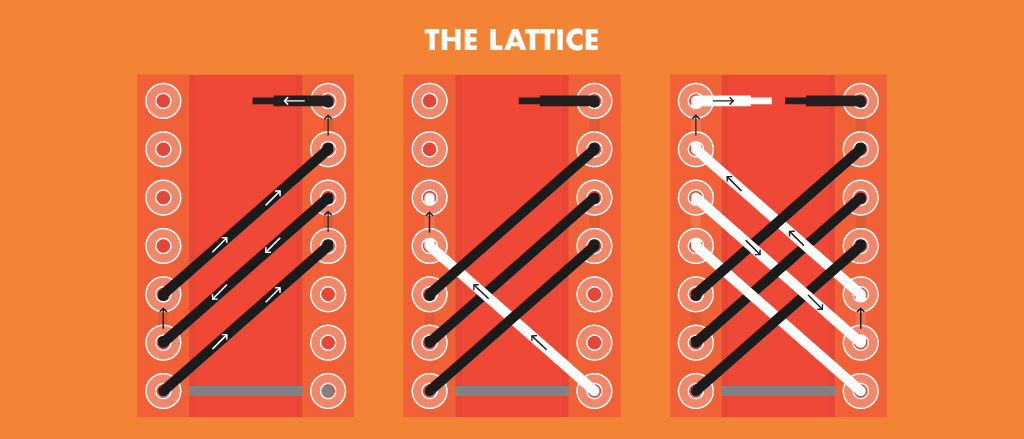
One of the most popular, decorative shoelace patterns, lattice lacing produces an intricately woven design reminiscent of a lattice pie crust (but not quite as delicious).
It may look complicated at first glance, but we found the process much easier when completing the left lace first before weaving the right. Just bear in mind you’ll need kicks with at least six eyelet pairs for this one:
- Start by running the lace up and out of the bottom eyelets (in this case, pair seven) and make sure both are even in length.
- Run the left lace diagonally upwards and into the right eyelet of pair four. Run this lace straight up on the inside and come back out through the eyelet above.
- Pull this end downwards diagonally left (it should run parallel to the lace threaded in step two) and into the left eyelet of pair six. As above, then run the lace straight up and out of the next eyelet above.
- Repeat step two, running the lace diagonally right and into the next eyelet, before threading straight upwards and out of the top-right eyelet (pair one).
- Now, take the right lace and pull in a diagonal-left direction to cross the pre-threaded left lace – this time though, alternate weaving the lace under and over, then insert into the left eyelet of pair four.
- As with steps three and four, repeat this process – pulling the lace straight up and out of the eyelet directly above, weaving diagonally downwards or upwards and into the next eyelet, before finishing by pulling straight up and out of the first eyelet on the left.
The starburst
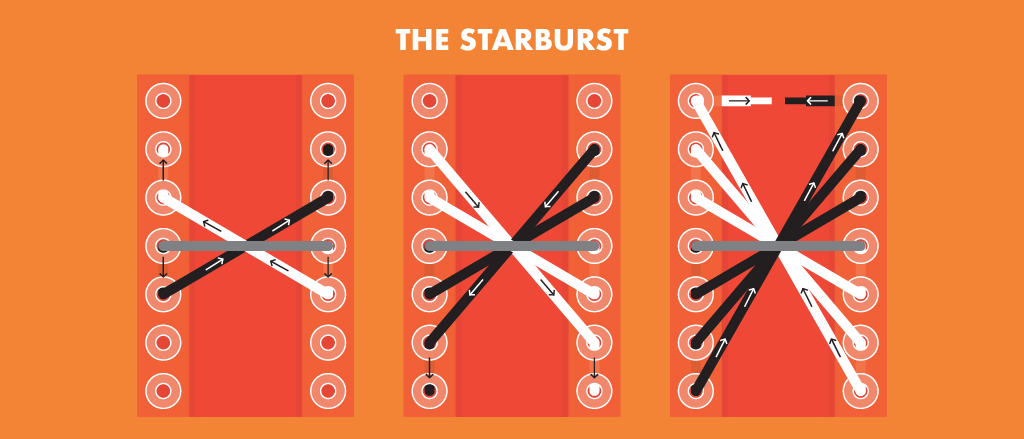
No, we’re not talking about your favourite sweets. The ‘starburst’ is a decorative method that can be used on shoes with as little as three eyelet pairs, and showcases laces crossing diagonally to form a point in the centre – hence looking like a magical starburst.
Though this way to lace a shoe isn’t the most secure or easy to tighten, it means your trainer can be opened wide, making it easier to slip your foot in or out without having to re-tighten the laces.
- As with the ‘star’ method of lacing, start with running your lace straight across on the outside of the shoe through the middle pair of eyelets (pair four in a seven-eyelet shoe). For shoes with an even number of eyelet pairs, use the eyelets below the middle point.
- Pull the ends straight down on the inside, and out through the next set of eyelets (pair five).
- Taking both ends, cross them diagonally upwards underneath the middle lace running straight across, and feed in through the next available eyelets above (pair three).
- Run both ends straight up on the inside and out through the next set of eyelets (pair two).
- Cross over underneath the middle rung again and enter the next available pair below (pair six).
- Repeat this process for the final pair of eyelets – running both laces straight down, out of the bottom eyelets (pair seven), cross over diagonally in the centre and into the top eyelets (pair one).
The zipper
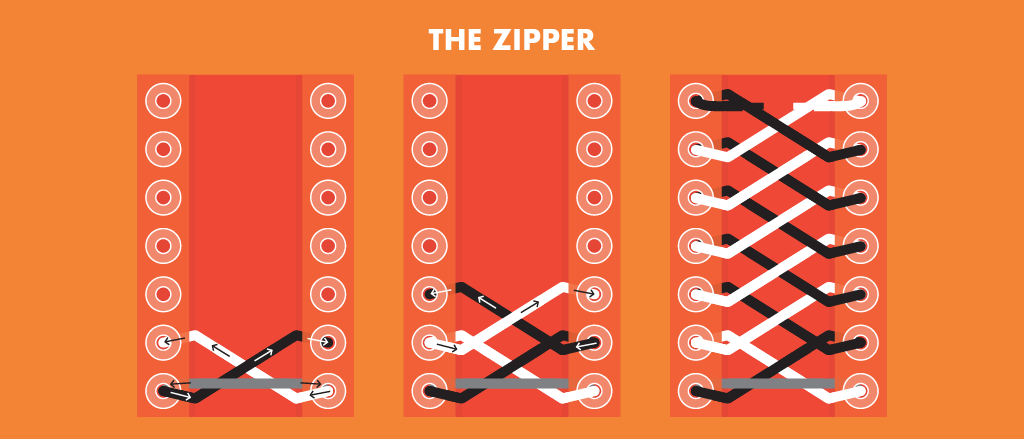
Our final ‘say what you see’ name, the ‘zipper’ lacing method has the appearance of an oversized zip but is a favourite for shoes that require firm support. Its locking, half-knot technique makes it great for skates or climbing boots tightly as the lower sections offer a strong hold while lacing the upper of the shoe.
It may look like a fiddly mess, but this style has the fewest steps out of our list so there’s no excuse! Plus, you’ll only need a minimum of two eyelet pairs to give it a try:
- Start with the lace on the inside of the shoe, and thread evenly upwards through both bottom eyelets.
- Cross the ends underneath the lace running straight across and up through the next eyelet.
- Following the same pattern, loop each lace under the laces which feed into each side of the shoe. Cross the laces over and insert upwards through the next pair of eyelets.
- Continue this looping, crossing and eyelet-feeding up each eyelet pair until you’re reached the top of the shoe.
We hope our selection of different ways to lace a shoe has got your creative juices flowing. If you’ve given any of our picks a try, take a snap and post it on our Facebook page – we’d love to see your super-cool sneaker upgrades!
Laces not quite doing your newfound deigns justice? Our array of shoelaces will help your handy work shine.